Sunday, December 30, 2012

Let it Snow


Hello Gazelle Peeps!

Kenya here to share a cute little card using the BossKut Gazelle! Did you know you can use pens and markers in your Gazelle without an additional holder? If you have not tried it, you are in for a treat! For today’s project, I decided to use the Gazelle to draw the snowman image (which came from the shapes library that ships with your Gazelle) and colored it in with Distress Markers.
Ok, it is no secret that I really love the O’Hannah collection! Aside from it being a beautiful cut file, it cuts so smoothly on the Gazelle. This file had become one of my go to files for sure!

The O’Hannah Frame Mat reminds me of a snowflake. I use the O’Hannah to mat the colored image.  I added Stickles to the mat and to the images (nice and sparkly). It turned out great right?

I hope you all enjoyed today’s project! Check out BossKut.com for files and inspiration! Thanks for stopping by, Kenya~

Files:

Thursday, December 20, 2012

Cookie Exchange


Hi Gazelle Lovers!

Around the holidays, a lot of people participate in the Cookie Exchange. If you are not familiar with it, the participants exchange cookie recipes or sometimes people exchange cookies. It is a good way to socialize and discover new cookies. It has been a LONG time since I took part in an exchange, but I think this is my year! I used the Gazelle and the File Folder Box to get me ready.

One thing I like about cut files is the fact that they can be customized to fit your needs. The File Folder Box does not come with a lid. However, I was able to use the existing cuts in the file and make one. The only thing I had to do was measure and score in the correct spots so the lid would fit over the chipboard (the Gazelle cut the chipboard with no problem)! Easy peasy!


I had to make the File Folders a little smaller so the lid would close. I covered the fronts of the File Folders with some pattern paper. There is an Index Card file available for purchase as well. You will need them to keep your recipes in order. They too can be decorated!

The label is from one of the Loopy Doily files (it comes with two doilies). I thought it was perfect for the look I was going for!

 I hope you all enjoyed today’s project! Check out BossKut.com for files and inspiration! Thanks for stopping by, Kenya~

Files:

Tuesday, December 18, 2012

Guard Home Decor


Hello Gazelle Lovers!

Kenya here to share some last minute and inexpensive home décor or gift ideas with you. As many of you know, I LOVE vinyl! One reason is because it cuts so beautifully on the BossKut Gazelle. The other reason is you can customize SO many things with it.

Today, I am sharing two projects (dinner napkin and hand towels) using Heat Transfer Vinyl which can be purchased at BossKut.com. For both projects I used the Mini Holly Collection. There are so many files in this collection. I guarantee you will not be disappointed. I decided to only use the holly.

I brought the file into FunTime and typed in the family’s name. When cutting HTV, make sure you mirror the images. I cut them out on the BossKut Gazelle using the vinyl blade with a speed of three and a force of 4 (because of the glitter vinyl). I did not do a kiss cut on this particular type of vinyl like I normally do. I used my heat press for the projects, but a good ole trusty iron will work too with a Teflon sheet. PLEASE make sure your images do not shift! One of mine did, BUT this is just for my home so it did not bother me much!

First I started with the holly and the lettering. I heated it for approximately 10 seconds. I peeled off the plastic and applied the berries and set it for another 10-15 seconds. Peel off the plastic. That is it! My kitchen is festive and I have some cool napkins too J

I hope you enjoyed today’s project. Please stop by BossKut.com for files, supplies and inspiration, Kenya~

*Please note, if you are gifting Terry Cloth towels, please let the recipient know they are for decoration only! The vinyl can peel due to the type of cloth. The napkins are fine to use J
Files:

Friday, December 14, 2012

Joy Book


Hi Gazelle Lovers!

I don’t know about you, but sometimes it is hard for me to think of interactive handmade gifts for people. I mean, everyone in my circle are not scrappers. Honestly, when people find out I make cards and I scrapbook, I get the eyebrow…to get them involved (without them knowing) I found mini albums are the ticket! However, they can be very time consuming. In the end though they are worth it because people add their own photos and they truly treasure them!

One of the new releases consisted of a “Joy” Word Mini Book. All of the work was done for me and I am going to look like I worked on this chipboard mini album for a long time (it didn’t take long…shhh).

This project was pretty straight forward. The first step was to cut the file with chipboard. Next I cut it in the pattern paper twice (one mirrored for the backs). I also cut the word Joy separately in chipboard.
 Once I had the album assembled, I used the O’Hannah Oval file for the label and corner. They were heat embossed with gold embossing power. I also cut the Swirly Holiday Tree file in glitter paper (can be purchased at BossKut.com). The tree file is very intricate to begin with, but to cut glitter paper can be scary. However, I was not afraid cutting it with the Gazelle. As you can see, it cut like butter! The photos can be place under the corners and the tree.


I hope you all enjoyed today’s project! Check out BossKut.com for these files and inspiration! Thanks for stopping by, Kenya~


Files:

Monday, December 10, 2012

Holiday Giveaway!!!

Hi Gazelle Lovers!

Pop over to BossKut's Facebook Page to enter to win!!!  You have three chances to win :)

Thursday, November 29, 2012

Trim the Tree


Hi Gazelle Lovers!

For the last two years or so, my daughters and I make ornaments for the Christmas tree. It allows us to spend time together and it keeps them busy for a while. This year, I wanted to try my hand at cutting felt with the Gazelle! Let me tell you, I was not disappointed!

When I saw the Moose File, I HAD to use it for this year’s ornament! The file has several layers to it, but I only used two of the layers.  To cut the felt, I used a small amount of Stiffy stabilizer (the more you use, the stiffer the felt will become). Once the felt was dry, I cut it out on my Gazelle using a deep cut blade, force of 6 and a multi-cut of 3. It cut with no problem at all using these settings. I only had brown and white felt so I colored the face with a glimmer spray. I also used googly eyes…so cute! The nose of the Moose was cut with the left over felt when I cut the antlers.

The ornament is light, but I used an eyelet to give the ribbon a little more support. Since the googly eyes have lashes, I made the Moose a girl by adding a bow.  That’s it!

I hope you all enjoyed today’s project! Check out BossKut.com for files and inspiration! Thanks for stopping by, Kenya~
Files:


Friday, November 16, 2012

Happy Birthday


Hi All!

My friend is having a birthday soon and when I saw the Turkey file, I could not resist! I knew I had to use it for his card! Isn’t it the cutest turkey ever?

Although the turkey is adorable, it can still be used for masculine projects! I decided to use the embossing tool instead of cutting the layers of the Turkey. Didn’t it turn out great? When you emboss, remember to mirror your image. I put the foil face down so the debossing was on the top. You must be very careful when lifting the foil or you may end up with unwanted creases and you can ruin your embossed images (if you are using foil).

The sentiment was stamped and then (wet) embossed. For the corners, I used a corner punch. I like this particular punch for masculine projects for some reason. To man the card up a little more, I added brads to the corners.

I hope you enjoyed today’s project. Don’t forget to go to BossKut.com for your embossing tool and embossing mat. I know you will enjoy using them as much as I do! Thanks for stopping by, Kenya~
* You can emboss on paper, cardstock, aluminum and more; adjust your force depending on the material you are embossing.*

Files:


Wednesday, November 14, 2012

Falling Leaves


Hello Everyone,

Kenya here to share a fun fall card with all of you! The leaves were cut on my BossKut Gazelle using the files that are in the Fun Time library. They were colored using various sprays. Once they dried, I took an embossing tool to make the veins. The daisy was stamped, colored with Copic Markers (can be purchased at BossKut.com) and fussy cut. It was layered on top of the Butterfly Doily which was colored with distress inks. For fillers, I fussy cut some of the images from the pattern paper.

To continue with the fall rustic look, I wrapped hemp cord around the mat and added my sentiment. The leaf is from my stash.

I hope you try out this fun card! Don’t forget to check out the images that come shipped with your BossKut Gazelle! Stop by BossKut.com for files, inspiration and supplies. Thanks for stopping by, Kenya~

Files:
Fun Time Files

Thursday, October 25, 2012

Gift Bag


Hello Gazelle Lovers!

One thing I love to do is dress up gift bags. It is so much fun to have the bag coordinate with the occasion and or the gift. On today’s project, I used the O’Hannah Square Frame Set and the O’Hannah Oval Frame Set. I really adore this set….can’t you tell? The detailed images cut beautifully on the Gazelle!


 For the border, I welded two of the borders from the Square Frame Set in Fun Time. Once they were welded together, I duplicated the border. I then copied the label from the Oval Frame Set. I added a hole for the ribbon.  Then I added a “W” and cut the imaged on the BossKut Gazelle

Although it is straightforward it adds just the right amount of something to the bag. Customizing a bag is a great way to present your gift to the recipient. I hope you try it out! Thanks for stopping by and do not forget to drop by BossKut for more files, supplies and inspiration! Kenya~

Files:

Tuesday, October 9, 2012

Wedding/Anniversary Card


Hello Everyone,

It’s Kenya here to share a simple card using the O’Hannah Oval Frame Set! If you have not checked out the O’Hannah Collection, I encourage you to pop over to BossKut and give them a looks see! They are awesome!

I cut the shadow on a piece of chipboard to use as a blackout (deep cut blade, force of 5 and speed of 2). I wanted to emboss and stamp without all of the layering. As you can see, the shape in the middle did not emboss. I stamped my sentiment in the blank space.

I used the O’Hannah Frame detailed cut as a ribbon slider. This adds a little splash of elegance to the card. To this, I added two different sized pearls and that is it!

I hope you try out embossing with a blackout shape; you can use positive and negative to give your card a different look  J Please stop by BossKut to check out the O’Hannah Collection! Thanks for stopping by, Kenya~

File:

Wednesday, September 26, 2012

BK DT Project: O'Hannah Thinking of You!


Hello Everyone,

Have you all seen the new releases?? All I can say is FABULOUS! For today’s project, I used the O’Hannah Frame set to make this simple shape card.


This project is pretty straight forward. I copied and welded two of the shadows together. Make sure you mirror the copy or it will not line up properly when you close your card. I layered the base with a piece of purple Core’dinations. Next I layered it with the detailed cut from the O’Hannah Frame. I love how well it cut using my BossKut Gazelle!  I cut this at a speed of 3 and a force of 2. I stamped my image on a circle with Momento Ink and colored the image with my Copic Markers which can be purchased at BossKut.
To add a little dimension, I added two more butterflies and a flourish.


I hope you enjoyed today’s project! Don’t forget to pop by BossKut for more files and inspiration! Kenya~

File:

Friday, July 20, 2012

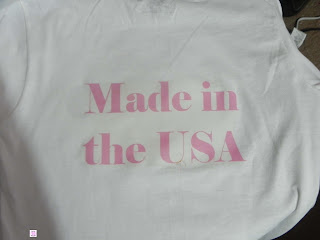
Made in the USA


Hello Everyone!

Who likes to wear their husband’s or significant other’s Tee shirts? I know I do! They are so comfy! My hubby is a machine operator for one of the largest tool companies and always brings shirts home these awesome shirts full of beautiful graphics. I always admire the artwork on them.

July is when my family takes our annual vacation. When I go and visit other states I like to go to the local craft stores there. Again, while wearing one of those awesome “tool” shirts and after seeing my friend Netta’s shirts (AWESOME), I thought why not make one to let more people know who BossKut is! I am a PROUD Gazelle owner and I for one would like to get people aware and curious to what a Gazelle is! This also gave me an excuse to use some of that printable heat transfer paper I been hoarding!


This project was pretty easy to do! I put a picture of the Gazelle and the BossKut logo into the software. I traced around the images. I also typed out “Made in the USA”. I printed off the image twice; once on the HTV and the other on a piece of scrap paper. I put the scrap paper on mat to use as a template and cut around the image and the font. Once I knew where the cuts were, I placed my HTV on the mat and cut around the images (Since I have not upgraded my Gazelle to the new 3point registration yet, I had to add an extra step). I highly recommend the upgrade (have you seen the projects using it! All I can say is awesome!


While the vinyl was cutting, I pre-heated my iron to the highest setting and set the vinyl. I peeled off the backing and my shirt complete!

I hope you enjoyed today’s project! You can use your BossKut Gazelle to make your own personalized shirts for your vacation too! Remember to pop by BossKut for files, supplies and inspiration, Kenya~


Tuesday, July 17, 2012

Froggy Anniversary


Hello Everyone,

Today I am sharing a card using the Lady PK Frog and the PK Frog. They are too cute! I cut them out at 1.5” in two different color greens. On the groom, I placed pearls on his stomach to look like buttons. On the bride, I put stickles on her bow and red stickles to replicate lips. I also placed pearls around her neck and added a bouquet of flowers.

The arch was cut using the Lace Border.  I welded two together and scored it at 1.25” and cut several marks up to the score line so it would bend easily. To hide the cuts, I added two layers of pearl strings around the arch. I also added stickles in between the lattices for the bling factor. The Lady PK Frog and PK Frog are sitting on the second Lace Border that comes with the file. I did not have a stamp that says “Hoppy” Anniversary so I just stamped “Happy” instead. The inside sentiment will have some type of pun to go along with the outside. I used pearls to make the sentiment stand out. The mat was embossed with an embossing folder.


That is it for today’s card. Thank you so much for stopping by. Stop by BossKut.com where the Gazelle is 100% assembled in the USA! Kenya~


Files:


Thursday, June 21, 2012

Love to Love You

Hello Everyone!
Love is in the air! Can you smell it? I do! June is usually filled with weddings! Today, I am sharing a layout I intended on giving to my Pastors for their wedding anniversary…BUT I love it so much that I may keep it since it does match the living room décor LOL! Because of my dilemma, I did not include a photo yet~
On the layout, I went with a monochromatic color scheme using only white, ivory, beige and neutral tones. I used several BossKut files! I used the Loopy Doily, Vine 0983, and a piece from the Damask Frame 0378. I really like how BossKut files can help embellish a page by using them as a standalone focal point or mixing them with other embellishments!  On this one, I did a little bit of both. I must say, there is a lot of layering and dimension on here!


The Loopy Doily has those beautiful loops; I didn’t want to do too much to it. I simply offset it and then embossed Happily Ever After on the center of the doily using white embossing powder. Then a photo mat was added for a photo. Tucked behind the doily are a piece of velum with both dry and wet embossing and another piece from the paper collection I used for the pattern paper.

The Vine 0983 is perfect to fill in for flower sprays. That is exactly what I did here! I cut two of them on my BossKut Gazelle. Then I used an embossing folder to add texture to them. I layered a spray of flowers on top. I also used the stem from the Damask Frame 0379 as a filler. The frame was perfect to use as the base for the flowers!


I hear you all asking about that lace! I am getting to it J Now that beautiful lace was in my DT package from BossKut! Isn’t luscious? As much as it pained me, I used two layers of that gorgeous lace! I also added two rows of pearls on top.

The charm in the corner and in the heart in the flower spray was also in my DT package. Because of the colors of the layout, I painted the charms with Picket Fence Crackle Paint and sealed them with an acrylic spray. This gave them an antique feel. I used the crackle paint around the pattern paper to give it a distressed look.

That is the gist of the layout! I hope I inspired you to pull out those wedding photos and get busy! Don’t forget to pop by BossKut.com for more projects, supplies, files and inspiration. Thank you for stopping by, Kenya

Files: