Friday, August 30, 2013

Thank you!

Hello Gazelle Lovers,

It has been a long time since I posted. A lot has happened since the last time I checked in. Well I have put my announcement off long enough. As of now, I am no longer a DT member for BossKut. Since the members were in different stages in life, it was decided to disassemble the team.

 I would like to thank Mr. & Mrs. BossKut for allowing me to be part of an amazing team and promote an AWESOME machine and images! I also want to thank Ms. Judy, Jamie, and Lori for allowing me to work with them and for their support! It has been a pleasure!

To my followers, I thank each and everyone of you for your comments and outpouring of love! It was because of the comments that kept the momentum going. I pray that I inspired you in some way!

As far as My Gazelle and Me, I will still post projects from time to time. I honestly have not been creating as much as I have in the past. As some of you know, I'm in the process of establishing a custom design business (Krafthead Kreations). It is in the ground works, but so far so good! I would like to share a few of my client's orders.

 Custom Mug
 
Custom iPhone/iPad Cover
 
 Glass Cutting Board with Logo


So until next time, SMILE, LOVE AND ENJOY LIFE! Kenya~

Thursday, July 4, 2013

Bombpops and Icecream


Hello Gazelle Lovers,

I scream, you scream, we all scream for ice cream.....and Bomb Pops!! Do you remember Bomb Pops? I remember the wonderful taste of cherry, blue berry and lemon bursting in my mouth!  Oh the gooey stickiness of the goodness dripping down my hands on a hot summer day! Talk about childhood memories; right? Then to top it off, a good ice cream cone...did I put you in the mood for a cool treat yet? I know what I will be serving on the 4th LOL!

For today's project, I wanted to have fun and give the girls some creativity freedom! We played with food!  I used the Ice Cream Cone file for the ice cream. For the cone, I used a score board to add the effect to the cone. I also used puffy paint and a red Viva Decor Pen for the cherry. The Ice Cream Cone file comes with cream and a cherry, but I wanted a little more shine, texture and dimension.

The Bomb Pop was made using basic shapes found in the software. I cut each color separately.  Finally, I added glass effects to the popsicle.  The words were cut using True Type Fonts. I added a shadow to them.

I did some splattering on the background.  I also added some Washi Tape ( thanks Mrs. Bosskut) to the background as well.  Again, this is meant to be fun and you can get the kiddos involved for 4th of July decor perhaps.

That's it! Thank you so much and Happy 4th of July!! Remember to stop by Bosskut.com for more projects, files and inspiration! Enjoy your summer, Kenya~

File

Friday, June 21, 2013

Scripture Gift

Hi Gazelle Lovers,

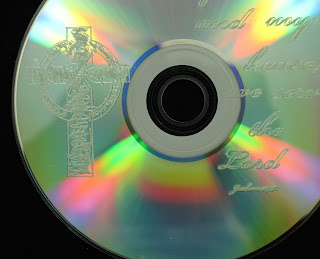
Have you ever held on to something but not really sure why? Or everything you look at you think, hmmm I can alter that? I tell you what, you are a true craftaholic! At my place of Worship, I am the leader of the Audio Ministry. From time to time, we get a bad CD. I used to throw them out in frustration. Then it hit me one day...Kenya, you are getting more material to play with..KEEP 'EM! I have so many ideas that can be done with them. Today, I am sharing one.

For this project, I used the Engraving tool. It is one of the most absolute reasons why the Gazelle is an awesome machine! The Engraving tool can add different effects to projects.

I engraved Joshua 24:15 to the CD. For the design, I used the Cross file. I added a few "scribbles" in the inside of the cross. However, in Funtime, you can fill your design with different types of engraving design elements! Nonetheless, the Gazelle did an amazing job with the engraving. I was pleasantly surprised at how well the machine fed the mat in with the CD as this is the first time attempting this. I was a little afraid, but as usual, the Gazelle can handle it! I punched a hole at the top to put on the rearview mirror, but it can be used as a home decor item! Just place on an easel and admire.

If you want to have more fun with your Gazelle, head over to bosskut.com to purchase the Engraving tool. You may not use it one every project, but it is a must to have in your arsenal! Kenya~

File:

Cross

Friday, June 14, 2013

A Father's Love

Hi Gazelle Lovers,

For Father's Day, my girls like to pull all stops for their dad. Each year they try to make his special day even better. They always ask me to make a card for all of them, but they also make him a card individually. When I first saw the Scale, I knew it would make a perfect masculine card!

I cut the top layer of the Scale on the Gazelle. I used Inka Gold Copper to give it a distressed metal look. The sentiment was printed using a laser printer. Sometimes, printing a sentiment is better that a stamp; especially if you don't have a stamp that says exactly what you need it to say.

 I notched the white layer so I could use puffy paint. I like adding puffy paint if instead of brads. It gives it the look without the bulk. That was layered on the same colored cardstock as the Scale. That was layered on a piece of pattern paper. The paper has a distress look too...PERFECT!

I hope you enjoyed this great Father's Day card! Don't forget to stop by Bosskut.com for more files, supplies, and inspiration! Kenya~

File:


Friday, June 7, 2013

All the Best


Hi Gazelle Lovers,

Lately, I have been noticing a lot of scrappers who are frustrated because life is hectic and they cannot get projects done. Sometimes simple is the best way to feel like something is accomplished. This year, I have a lot of graduates in my life. Here is a simple graduation card that can be massed produced in minutes. Let the Gazelle do most of the work for you!

I used the Graduation Cap and Diploma files. I did not use the ribbon that comes in the file with the Diploma. I layered it with a scallop from the Butterfly Doily. I made it into a ribbon to show case the cap and diploma. The mat was embossed with a script embossing folder.

That's It! Remember to stop by bosskut.com for more files and inspiration. Kenya~

Files


Thursday, May 30, 2013

Prom Corsage


Hello Gazelle Lovers,

Prom is a true sign that then end of the school year is near. I love to see parents and their children, girls especially, scouring the malls and stores to look for the perfect outfit that signifies one of the most memorable moments in their young lives. I look forward to when my daughters are old enough to attend prom. However, I am not looking forward to the price tag that is going to come along with it! Good thing I have some skill to take a little pain away from my (well hubby's) wallet!

I believe no prom dress is complete without a beautiful corsage! When I saw the new Carnation file (coming soon), I knew instantly it would be perfect! I teamed it up with the Forget Me Nots (roses) and it was a perfect marriage.

I cut all of the layers for the Carnation in yellow. I staggered each layer to give it a more realistic look. Next I wet the layers of cardstock so the flower would not look stiff. Once dried, I glued the layers together. I did the same process with the roses x2. Optional, take the center out of the Forget Me Nots in the software before cutting. I like to do this if I am using hot glue.

Once the flowers were assembled, it was time to put the corsage together. The base is a piece of tulle. I scalloped the edge to give it a finished look. Next I added a blingy spray from my stash. Next I added the Carnation and roses. Once everything was in place, I used elastic ribbon to go around the girl's wrist. I like to use this type of ribbon because it is pretty and it is comfortable.  The girls can dance all night long and be confident their corsage will last!

I hope you enjoyed today's project. Don't forget to stop by BossKut.com for more files and inspiration. Thanks for stopping by, Kenya~

Files