Saturday, May 26, 2012
***SALE***

Tuesday, May 15, 2012
Teacher's Simple Tumbler
Hello Everyone!


Teachers have a way to affect our lives forever. Each and
every one of us has that one teacher we will never forget. My teacher was Ms.
Winters! She was my kindergarten teacher and she was a hippy LOL! She was so
down to earth. One thing I loved about Ms. Winters was how she read to the
class! She knew how to make a book come to life J
It has been many years since I seen or heard from Ms. Winters, but I think
about her often. Please remember the teachers in your life...past, present and
future J

Today, I would like to share a really simple Teachers
Appreciation project that can be put together in minutes using your BossKut
Gazelle. You can go simple like I did or go wild by layering different colors
of vinyl (can be purchased at BossKut.com).
There are many school related files available on BossKut.com. However, I decided to do
something on my own. I constructed an apple from a sketch. What I love about
FunTime and the Gazelle is I can do what I like J.
Once the apple was to my satisfaction, I welded the teacher’s initials in the
apple using FunTime fonts. On the back, I put a simple quote on the back.

That is it! Vinyl is so fun to work with and it cuts like
butter in the Gazelle! Don’t forget to pop by BossKut.com
to check out the vinyl selection, vinyl blades, files and inspiration. Kenya~

Friday, May 11, 2012
Mother's Day Sweet Cards
Hello Everyone!


Kenya here to share two cards using the newly released Loopy
Doily! This card can be massed produced in the matter of minutes! For the
base of the card, I made a shadow (4.2”) of the doily and welded it to a
rectangle which measures 4.25”x5.5”.
Once the base is folded in half, it will be a standard A2 sized card
(4.2”).

The gold card, the Loopy
Doily’s top layer was embossed with gold embossing powder to match the
pattern paper. I also embossed the sentiment. The pearls were colored with the
Golden Yellow Copic Marker (can be purchased at BossKut.com). The butterflies were punched
in the same pattern paper on the base of the card. I added pearls to the
center.


For the yellow and white card, in conjunction with the Loopy
Doily, I used the newly released RufflesPKButterfly.
The butterfly is mounted on the center cut which was dry embossed to add
texture. I decided not to add a sentiment to this one. To finish it off, I
added pearls to the RufflesPKButterfly
and a pearl flourish. I also added pearls to the base of the card to pull
everything together.


That is it for today! I really hope you enjoyed today’s
cards. Don’t forget to pop on over to BossKut.com
for ALL of the files, supplies and to check out other projects from the
talented DT! Thanks for stopping by, Kenya~

**Please note, I
suggest lining the shadow to the top layer to make sure the loops line up
correctly before applying adhesive!
Files:
Tuesday, May 8, 2012
Shadow Box Card
Happy May Krafters!


Shadow box cards are one of my favorite projects to do! When
I discovered these two years ago, I was hooked! Yes they are cards, but they
can double as a beautiful home décor piece. I HAD to use the newly released RufflesPKButterfly
and ParkerPKflower!
Both files are so cute and adds dimension without the bulk!

For this card, I cut an 8.5”x11” sheet of card stock in
half. I scored both pieces at 1”, 1.5” 7” and 7.5” you will fold the papers
using the mountain valley fold. These two pieces forms the box. Then you can
use your BossKut Gazelle, BossKut die or punch to cut
a shape in the middle of one of your panels. This will become the front of your
card.

I typically decorate the inside before the outside of this
type of card. Since the RufflesPKButterfly
file and the papers are so pretty, I did not want to do too much. Usually, I
add a nice sentiment in the inside, but it will go on the back so the focus
will be on the butterfly. I added a rhinestone flourish. Once the inside is
decorated, adhere the back panel to the front by meeting up the outer folds.

On my sample, I dry embossed the side panels for a
decoration (do this before adhering to the back panel). I also added pattern
paper to the front to coordinate with the pattern paper inside of the box. To
decorate the outside, I used the
ParkerPKflower file. I also used cherry blossoms (you can make these with
the Forget Me Nots file J
if you’d like) as fillers. That beautiful lace came from Ms. BossKut…ah, it is
gorgeous (thank you)! This was also sprayed to match the pattern papers. I
added flourishes and the sentiment to complete the outside.

The sky is the limit to what you do with these! I have made
them to be interactive or stand alone as I did for this one! Please remember to
pop on over to BossKut.com for files, die and
supplies…you like how that rhymed LOL! Have a wonderful day, Kenya~

Files:
Tuesday, April 24, 2012
Dress Up
Hello Everyone!

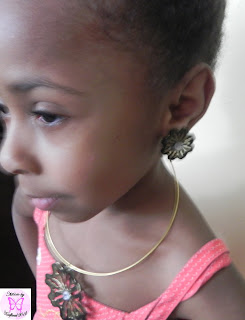

What girl doesn’t like playing dress-up? My girls love going
in my closet to grab heels and clothes! Well recently my girls took over my
closet, but there was one problem….the girls needed accessories LOL! I thought,
why not use my BossKut Gazelle along with awesome files and see what I come up
with! I will be the first to admit, this is jewelry for fun BUT with the right
outfit….. J

I cut file 0376 Florette II on
thick cardstock. The charm was cut at 2.5” and the earrings were cut at 1”. The
detail cut out great on the smaller cuts! Once the images were cut, I used the
melting pot and UTEE for stability. After the UTEE cooled, I added Gold Perfect
Pearls. My daughter wanted to add bling…so there you have it!

You are really are limited to your imagination! I think if
you enjoy unique jewelry, you can really make some awesome one of a kind
jewelry with your BossKut Gazelle! You can really bling it up!

I hope you enjoyed today’s project! Don’t forget to stop by BossKut and check out the talented DT and
for more files! Kenya~
Files:
0376
Florette II
UTEE-Embossing Powder
Gold Perfect Pearls
Melting Pot
Rhinestone
Thursday, April 19, 2012
Water Fun-Platinum Scraps Challenge
Hello Everyone!


I am here today with a project using a sketch from Platinum Scraps!
I had an awesome time last week playing in their challenge and thought I would play
again! When I saw the sketch, I immediately knew what picture I wanted to use. Go
on over there to Platinum Scraps
and see all of the different interpretations of this great sketch from all of
the talented designers!
For this layout, I used different DCWV paper collections;
The Spring Stack, Butterfly & Blossom and Green Tea. The blue pp reminded
me of a pool. To add a little interest to the paper, I painted some “waves”
with acrylic paint and Marshmallow Glimmer Mist. Now the paper has shimmer!

In a
similar pattern, just darker, I cut the bubbles and shadow for the title. I also
used the Wave Border Punch (Fiskars) to punch a border in that same paper. The pattern
from the mat was layered on the wave. The strips were cut from the paper
collection. I used the Gazelle to cut the title.

The flowers are a combination
of I Am Roses (gardenias, rose buds-orange, cherry blossoms), Prima (yellow and
pink roses), Stamping Scrapping (white rose buds) and Michael’s Dollar Bin (white
mini roses). The foliage was cut using Spellbinders dies. The butterflies are
from a Martha Stewart punch and ZVA crystals were added.

That is it! I hope you enjoyed today’s project. Remember to
go over to Platinum
Scraps to play along! Have a great day! Kenya~
Wednesday, April 18, 2012
You're the Best
Hello Everyone!
Today, I would like to share a simple card that can be used
for Mother’s Day or as an encouragement card. Presley’s Curls has become my favorite file! Not only does it cut beautifully using
the BossKut Gazelle, it is SO versatile and it has special meaning! You all
will be seeing a lot of this file LOL! This time, I used the shadow to form the
card by welding two of the shapes together. Make sure to mirror one of the
shapes to ensure they line up properly. Then I layered the detailed image on
top. I used an embossing folder for the middle section to add texture.

For the embellishments, I used the Forget Me Nots for
the large rose in the middle. I used Mustard Seed Distress Ink to compliment the yellow in the rest of the card. I added the rest
of the embellishments from items I had in my craft room for a finished look.

I hope you enjoyed today’s project! Please stop by and visit
BossKut for more files and inspiration!
Kenya~
Files:
Other Products:
Mustard Seed Distress Ink
Spellbinders Foliage
ZVA Pearls
Viva Decor Pen
Martha Stewart Monarch Butterfly Punch
Musical Flourish Embossing Folder
I Am Roses
Subscribe to:
Posts (Atom)